SonexAus – How to post to this site First of all, you have to join Wikispaces by creating an account with an email address, a user name and a password. Then you join up to SonexAus wiki. You will be a member when I receive an email from Wikispaces and approve your membership. You have probably already done this.
Then you can read or edit any page on the site. The idea is for each person with a project or completed aircraft to have their own page on the site. You can add text, photos, Youtube items etc to your page, as well as putting a link to other sites, such as your own personal website. If you have put a lot of effort into creating your own website elsewhere then don’t duplicate it here, just put a paragraph and a photo or two and then provide a link for users to go to your own site.
Here is how to create your own page:
1. Select ‘New Page’ from the top left hand corner. When it opens up you will need to give it a name. Suggest you use your own name or the type of aircraft (eg my page). You can give the page a tag such as Xenos motor glider, Sonex Sport Trainer, etc. We can experiment with these and see how they work. Then hit the ‘Create’ button.
2. You select the page and hit the ‘Edit’ tab at the top right. A text editor bar appears and you can then start entering content onto your page. Before you start typing directly onto the page I suggest you get yourself organised first. To get out of the editing mode hit the ‘Save’ button.
3. I strongly suggest you prepare all your text in a word processor file first, such as Microsoft Word. Where you want a particular picture to appear DO NOT INSERT IT IN YOUR WORD FILE. Insert the name of the photo, and the best way to do this is to number them consecutively ‘stuart pic 1’ ‘stuart pic 2’ etc. All the photos go into a folder on wikispaces so you must ensure that they have a unique name.
4. Select all your photos and save them to a separate folder on your computer. I suggest you open them with Microsoft Picture Editor and using the ‘Edit pictures’ tab, select ‘Compress pictures’. Compress the picture ‘For web pages’. Rename all your pictures according to the naming scheme you used in your text.
5. Now go back to your page and hit ‘Edit’. You can select all your text from your MS Word file and paste this into the website. Go through and at each point where you wanted to insert a picture select the ‘File’ button. The first time you do this you will be asked to upload all your photos. Follow the instructions to find the folder with your pictures and to select ‘Upload’. It takes a little while but when it has finished you will see a thumbnail of the pic with the file name. You can select the photo from the list by entering in the file name in the search box. Insert the first pic, move to where the next one goes and go back and select it from your uploaded photos listed.You will figure out ways to enhance the layout and make it look good. Go to it.
Discussion Page and Page Edit Notifications:
If you want to be notified about changes made to a discussion i.e. new message added and you are not the Creator of the discussion.
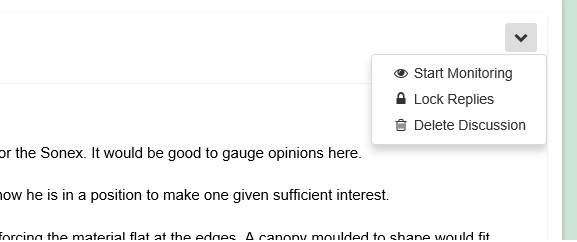
Hover your mouse over the TopRIght of the page until a Single Chevron appears
Click the Chevron and a Menu appears:
Select Start Monitoring and you will be emailed whenever a new message is added to the topic.
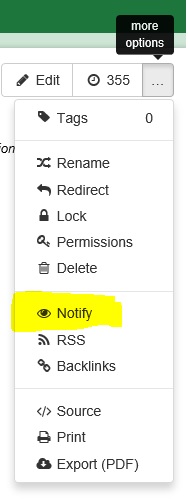
This can also be done to monitor a Single Page edits
On the page you want to monitor select the 3 Dot button for more Options.
Select Notify


