SonexAus – Pete’s Pneumatic Tail Wheel Pneumatic tailwheel I have been running a pneumatic tail wheel for the past 18 months, but why go to all that bother when the stock wheel works OK? I happened to have a small wheel and tyre available and felt compelled to get rid of the horrible dangalangalang sound whenever I taxied. The important benefit of using a pneumatic tail wheel is that flexing of the tyre greatly reduces loads on the suspension and supporting structure, as well as eliminating all those little loads that cause the dangalang sound. Since I have heard of several builders who had tail wheel castors or tail spring brackets fail it seemed like a worthwhile thing to modify, and it’s also a part of the structure that can be modified without any great risk. I made my original wheel castor to my own design mainly because it was easier for me to make, but I also judged by the shape it would be stronger without a weight penalty.
When I made the castor for the larger pneumatic tyre I thought I better look at the design a bit more carefully so modelled all the castors in Solidworks which has limited finite element capability. You have to be pretty careful with this sort of modelling or you end up with unrealistic results, especially around fixture points. In all these cases I made the fixture points at the steering pivot and applied a load of 1000 newtons (about 100 Kg) to the axle holes, just because I guessed a decent thunk on the ground would be about 3 to 4 g. No steering forces are applied, just the bump load. You might notice that in the following pictures, red shows the most highly stressed regions, but that the value of the red is different from picture to picture.
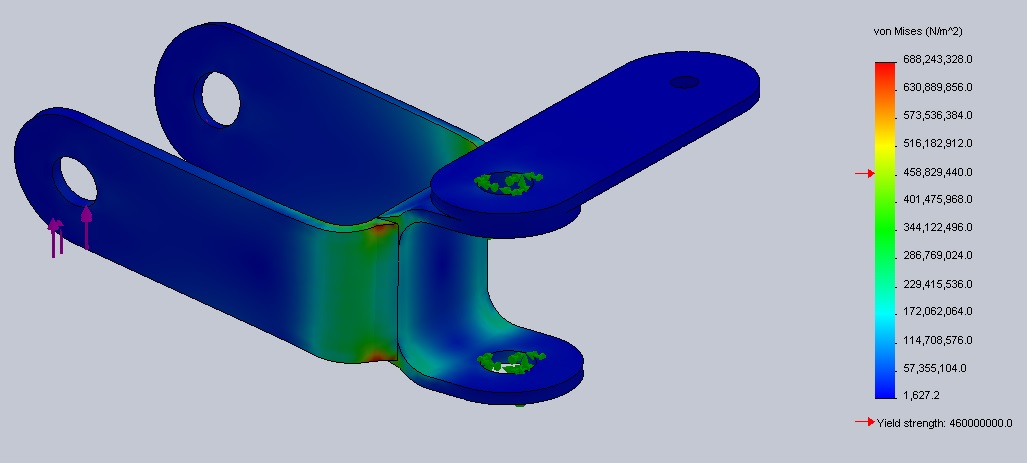
Here’s the Sonex castor

Mass = 140 grams, Max stress = 688MPa This depends to some extent on how smooth the welds are, but it’s still pretty high. From this model you could expect fatigue cracks to grow from the highest stress regions.
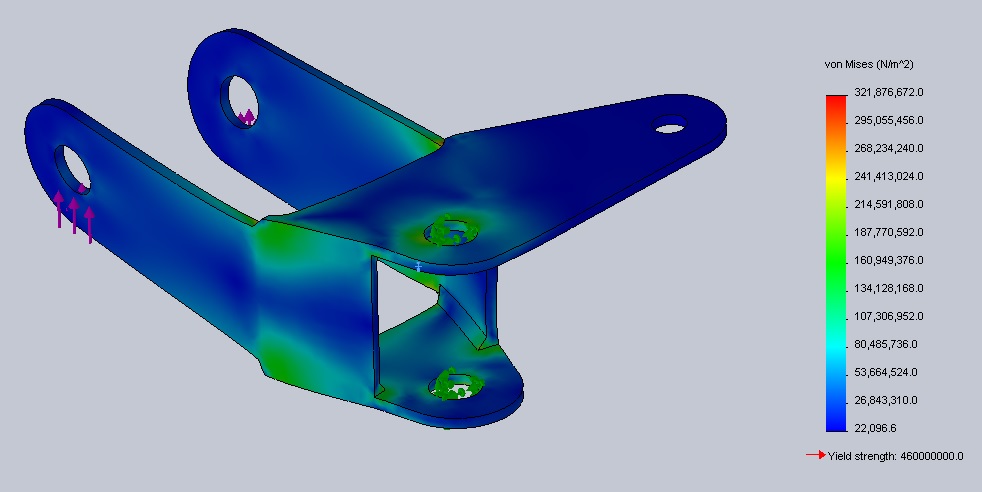
My original castor

Mass = 120 grams, Max stress = 322 MPa Stress is halved but this design still had some problems of the original Sonex design; the pivot bolt hit on the ground and the wheel sounded horrible. It was fitted with a plastic tail wheel with mass of about 290 grams so all up mass was 460 grams. With the usual aluminium tail wheel all-up mass would be about 680 grams.
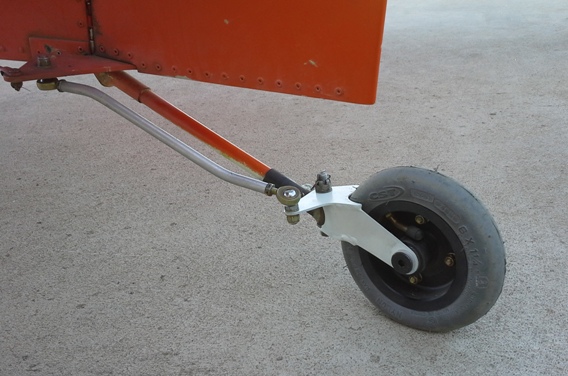
Fallshaw wheel with pneumatic tyre
The tyre is a 50 x 200 (that’s 8 inches in old money) so the castor has to be much larger, and also hold the wheel lower to clear the rudder. Here it is:
And here’s the stress analysis:
Mass = 250 grams, Max stress = 264 MPa
Mass of wheel and tyre = 680 grams so all up mass is about 980 grams.
I probably could have made it a bit lighter but at this stage wasn’t too worried about weight, and it’s still not a hell of a lot heavier than the original aluminium roller skate wheel and castor. This wheel has done about 140 landings, but has worn out two tyres. Those little tyres don’t have too much tread. I am pretty happy with this arrangement but wanted to make something really light which would even be suitable for a Jab 2200 powered tail dragger, and here it is:
6 x 1.25" tyre on 4" wheel

I bought the tyre and tube from a place that sells wheelchairs and mobility scooters, but they couldn’t supply a wheel so I ended up machining an offset split wheel from PA 6 Nylon after doing a far more complicated stress analysis.
The tail wheel castor is thinned down a bit from earlier designs.
Mass = 150 grams, max stress = 248 MPa All-up mass of the assembly is only 540 grams. My main concern is life of the tyre. I have only recorded 15 landings so far but it appears to work well. I’ll keep you posted.
Have just changed the other rim half from nylon to aluminium because the nylon one distorted too much. Weight is slightly lighter because I was able to dispense with 4 large penny washers on that side and use countersunk screws.
Incidentally, all the brackets I have made are not welded, but brazed. I think the process is sometimes called braze-welding. I use "Comcoat N", which are nickel-bronze self-fluxing rods readily available from welding supplies and even hardware shops. They are pretty easy to pick because of the pink coloured flux coating.
The advantages of nickel-bronze are:
- It’s very easy to use
- You don’t have to get the base metal anywhere near as hot so the heat-affected zone is smaller
- It’s pretty strong – about 250 MPa yield stress which might not sound too good compared with 460 MPa for the 4130 steel, but if you design the bits right you can often keep the welds away from the really high stresses.
- It is very tough – you can use it for hard facing and building up worn surfaces
Disadvantages:
- The part can’t be heat treated, but then none of the Sonex bits are heat treated
- The flux forms a glass-like slag which is extremely difficult to remove.
Update July 2014
Have now done 36 landings with the little wheel and the tyre still looks OK. Seems to be wearing better than the larger 50 x 200 tyre.
Update Sept 2014
Have now done 64 landings on the little wheel and tyre is lasting well. I think I’ll call this one a success.
Final Update
The tyre was eventually replaced after 85 landings. Tyres cost about $20.

