

By April 2001 I had completed the vertical tail and rudder, horizontal tail and elevator, flaps and ailerons, main and rear spars and the ribs. The main spar had been the biggest job to that date.

Detail of the rudder control horn and drive rib. The hinge is full length. All rivets are 1/8″ stainless steel pop rivets. The skin material can be purchased pre-bent from Sonex as part of the formed kit.
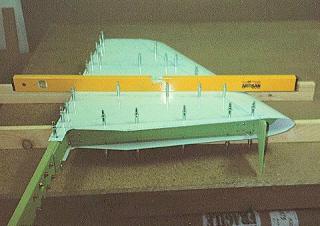
Final stages of fitting the skin to the vertical tail just before riveting. All the work can be done on a flat table because the ribs are parallel. No jigs are necessary.
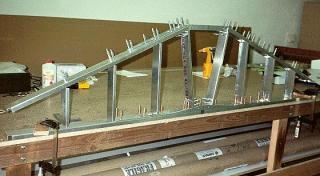
The completed horizontal tail frame clecoed prior to riveting. The spar fittings are made of 3/16″ angle. The spar webs and ribs are made from pre-formed channel material. As for the vertical tail all the work is done on a flat table.

The skinned tail prior to riveting. The skin is cut and shaped from .025 sheet material. The leading edge is bent by hand and drilling is done by careful layout from the plans and checking against the actual frame. The elevator is attached by a full length hinge. During proof load testing by Sonex the tailplane could not be broken.
Band saw cutting of the the special extrusion material to make the upper and lower spar caps. The caps taper down to 1″ width at the ends. I went through two bandsaw blades by the time I was finished.

Filing down the spar caps to final dimensions. Certain sections need to be finished flush with the centre web. Tricky to do because you can’t scratch the web. All scratches have to be removed. The caps are finished with 220 grit paper and polished with scotchbrite

Spar fittings and webs completed and ready for assembly. All are made from sheet or angle extrusion material. The brown colour is alodyne anti-corrosion treatment.

Right hand spar front view. The root ends of both spars overlap. The inner webs and spar cap are countersunk and the outer web is dimpled for flush rivets in this section.

Right hand spar rear view showing stiffener angles, root pin block (at left), rib attach angle (right of picture).

The spar root is massive. You could stand an elephant on these things.

Spars during riveting. Note the air rivet gun and specially shaped bucking bars which I had to make to fit the spar cap extrusion.

Both spars completed. Root rib attach angles are left for riveting later on for easier access to the ribs during wing assembly. Next job the rear spars and then the wings can be assembled.
The next page in Lynn Jarvis’s Sonex project features the wing.
Lynn Jarvis’s Sonex project
| 1. Introduction | 2. Sonex specifications | 3. Building the Sonex |
| 4. The tail and spar | 5. The wing | 6. The aft fuselage | 7. More on the fuselage |
| 8. It all comes together | 9. The canopy | 10. The engine | 11. Electrical | 12. The cowling |
| 13. Paint and polish | 14. Moving | 15. Finishing | 16. First flight | 17. Natfly 2004 |